

 ENGLISH


 Thanks for such a quick turnaround, and thank you also for being so thorough in every detail!
HELP

HELP >
Product Photography
How to take your own product photos for your online store
There are many reasons why you might want to produce your own product photos for your website - to save costs, to save time, to get exactly the photos you want, to cater to a customer's request, to avoid copyright issues, etc etc. The list really is endless. In this tutorial we'll take you through the basics of product photography, and how to avoid common pitfalls.
If you have the enthusiasm for handling it yourself, you'll find the returns well worth your time and money. Initial equipment costs are minimal, and I guarantee you'll be selling in no time at all.
Copyright Issues
Simply put, anything published to the internet invokes copyright privileges to its publisher, unless the copyright is already owned by another. For example, if you were to display product photos of a toaster on your website, but the photos were provided by the original manufacturer, then they automatically have copyright (unless they state otherwise).
However, if you were simply acting as a retailer for that manufacturer's products, they are highly unlikely to object if you 'borrow' product photos from their website. After all, you will be making them money in the end. But don't take that as a given!
The GOOD NEWS is that you can completely avoid copyright issues if you take your own photos of that very same product. In the same way that the photos a manufacturer might provide confer copyright on them, any photos you take confer copyright on you. You can do what you like with them. Very, very occasionally you might find a statement on product packaging (on boardgames, for example) that says don't duplicate the artwork image - in that case make sure you need to exercise a little more caution, when taking your shots.
And don't forget that you can scan many items directly into your computer, rather than taking product photos (e.g. if you're selling neckties, then simply stick the tie into a scanner).
The most important point - FOCUS
 A no-brainer, right? Exactly. But just take a quick look at the items on sale in Yahoo Auctions today. You'll see that, certainly for the smaller items, maybe as many as half are taken in poor focus. And unless a customer knows what it really looks like, then you've just lost that customer.
These days digital cameras are extremely powerful, and getting cheaper by the week. Buy yourself whatever you can afford - it doesn't need to be flash, but it does need a very short focus range. This is known as the macro-range of a camera. A standard film disposable camera only focuses properly for distances of over 80cm or so. For product photography that's not going to help much. Obviously you want as small a minimum distance as possible, but if you try and aim for a camera which can focus at about 20 ~ 30cm, that should be enough! So try a camera in the shop, before you buy. Other plus-points you might want to look for are:
- manual focus option : most cameras are good at focusing, but it is sometimes necessary...
- manual white-balance option : this allows you to set the camera for different lighting conditions
- remote control : handier than you might think...
- tripod-mountable : look for the screw hole in the bottom of the camera
So you've got your camera. Now what? Well, you might want to consider a tripod to mount it on, to get your camera positioned right where you need it. When focused at extreme close range, even pushing the 'snap' button to take a picture can jerk the camera enough to blur a picture. So that's where setting it to use the remote control or timer might be a good idea.
Do you know how to get the camera focused at close range? Most cameras have an automatic focus button (usually a flower head icon or similar), and some can also be set to focus only on the very center of the viewfinder (but don't use that option if your item has a depth greater than 15cm or so). If you focus the camera manually, use a tape measure to establish distance first.
NOTE: Computer photoshop software can clean up a photo's focus to some extent, but don't rely on it too much.
Getting that 'studio' effect
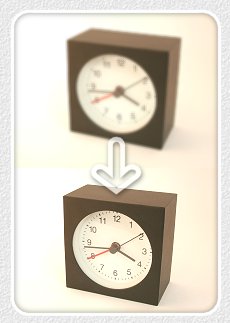
 Almost all professional product photography is done indoors, in artificial light. Even where a photo seems to have natural daylight in the background, chances are that it's fake. The photo on the right shows the difference between direct sunlight falling on an item, and diffused daylight (i.e. still in a well-lit room, but away from the window). An improvement, but still not perfect.
Having a room well-lit by daylight is very useful for general purposes (saves on bulbs!), but the area around where you're taking your product photographs needs more manipulation. A good background level of natural light should be complimented by careful artificial lighting for best results.
Lighting your items properly
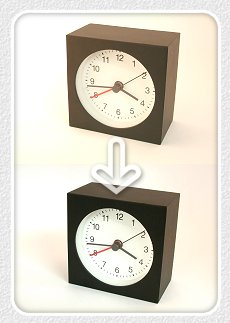 So now we come to artificial lighting. The image on the right shows the difference between normal household lightbulbs and 'daylight' bulbs, when applied to an item photo. Standard bulbs produce a slight yellowing of the image, which is usually to be avoided if at all possible. Daylight bulbs are a little more expensive, and have a pale-blue tinge to them. These bulbs can more closely match natural daylight effects. Silly, right? ... "Don't use natural light, but do use bulbs that mimic natural light" !!
The result is product photos that have fuller colour ranges; whites are whiter, blacks are blacker, and colours are 'truer'.
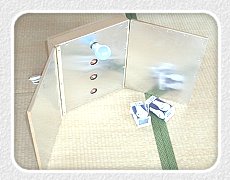
So, how do you get good lighting? Well, you need a lot of it! Plenty of fluorescent strip lights are effective, although a little unwieldy. Instead I recommend getting half a dozen plastic grip-lights with 60W daylight bulbs, which can be attached to pretty much anything, giving great control over your light sources. You could go one step further, and create a basic mirrored box (see left), which can produce accommodate four 100W bulbs if necessary. I generally use a combination of both, with the large mirrored box on the left of an item, and clip lights dotted around in other directions.
What's a lightbox?
 A lightbox is a tool that you should seriously consider if you intend to take product photos regularly. Depending on the size of your products, lightboxes can be purchased for as little as 6,000 yen, and will make your photos look that much more professional. In its simplest form, a lightbox is a white cloth box into which your item is placed. Your light sources are then arranged around the box, and regardless of where they might be placed, you'll get excellent 'surround' light with no visible light sources. It spreads the light from a single lightbulb around a greater area, thereby removing the shadow you're likely to get from a single source. Note that this might even allow you to take photographs in natural daylight, while still hopefully removing any undesirable shadows.
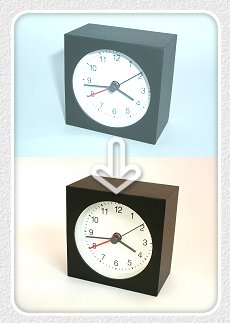
The photograph on the right shows what typically happens when you try to take a product shot with a camera flash. You lose picture clarity, the colours are messed up, and the photo generally looks rubbish. Since you want to present your product in the best possible light (pun intended), use a lightbox, and make sure you can turn off the flash on your camera. The difference can be startling!
Lightboxes can take many forms, depending on your budget:
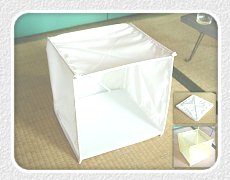
1. The first photo below shows my own handmade lightbox, for which I simply used a foldable storage box from my local Nafco, and swapped the existing yellow material for some thin white cotton. Plastic rods are sewn into the seams, keeping the cube fairly rigid. A sheet of thick plastic is placed in the bottom of the cube, and a simple 'X' of plastic rod ensures the box stays up. The extra support rods also allow you to blu-tak your background paper in place (see next section). This lightbox was used for all product shots on this page, and does a competent job, I think?
2. The second photo is the basic lightbox that you might find in a big-city electrical/camera store (e.g. Fukuoka's BicCamera). It's essentially the same as my handmade box, except that the front opening is smaller. This form also folds up into a two-dimensional square, and is available in various sizes.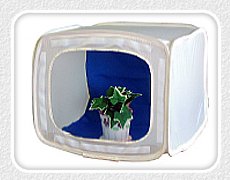
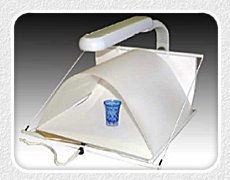
3. This is a fancier version, and includes a light source and a rod for clipping your background sheet in place. It costs 17,000 yen. Note that you would still need additional lighting to create a suitably bright image. This model also folds up for convenient storage, but if you have space then it might to sensible to create a permanent photography area. All you need is a low table for the lightbox, and some clip-lights and multiplugs. Saves time setting up every time.
Try Yahoo Stores, Rakuten and other similar internet shops for good, cheap equipment.
Choosing your backgrounds
 Having a consistent look to all of your photos is a major factor in producing professional-quality product shots. Take some time to consider how you would like your shop's products to appear. Would a simple white paper background suffice? Or do you want to incorporate your site's colours or logo into the background? Textured or graduated paper backgrounds can add very stylish effects to your photographs, and some ideas are presented below:
- White : most commonly used for product photos online (having no shadows or visible edge to your photo is the intention)
- Black : very dramatic shots, works well with jewellery (shadows are emphasised)
- Red : with very visible backgrounds you should aim to have a slight shadow
- Blue : as for red, shadows are important (slight texture variations are effective too)
- Sand or tan : again, a textured surface is advisable
- Off-white or parchment : textured paper helps to remove suggestions that it was a poorly-lit white background!
- Highly-textured paper : this was a ridged brown paper background, which gives a nice, solid feel to the product without introducing any harsh lines
- Graduated paper : this was a simple printout made using Microsoft Office software, and is surprisingly effective. As long as shadows are eliminated from the shot, it looks fantastic (so don't look too closely at my rushed version!).
Trimming your photos
 So you've set up your camera on a tripod right at the front of your lightbox, and you've set it to shoot from a remote control or timer, with the flash turned off. Your camera needs to be slightly above the top of your item, looking down on it. You should aim to fill the viewfinder or screen of your camera almost entirely. If you're using a plain white or graduated background, then you should have eliminated almost all your shadows, so your item can fill the shot. However if you're using textured background paper, then you need to allow for the shadow to also be included in the product shot.
Take your shot.
You might need to play around with exposure time to get the brightness right (the longer the camera exposes the 'film' to daylight, the brighter your photo will be), and take a couple more shots before you can get it right, but then you're off, and can fly through your other products quite speedily.
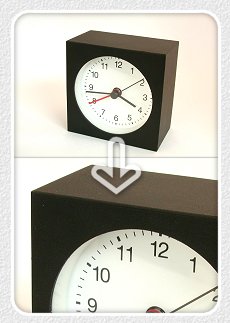
You can rush to your computer and download the photos from your digital camera. Check first that you've got your focus correct. If you're lucky then your photos are already finished, and can now be uploaded to your internet shop database. Following the steps outlined above should provide you with as good a photo as you're ever going to get (see right), but you may find you need to tweak some of your photos slightly. For that you'll need some basic paint or photo software on your computer. Professionals tend to use Adobe Photoshop, but it's not a terribly user-friendly piece of kit. Instead I strongly recommend one called Paintshop Pro, available in English and Japanese. This software is extremely easy to use, and has the added advantage of being customisable; you can add and remove buttons to your toolbars, for quick access to your most commonly-used functions. Some of the buttons you might find useful to add are:
- brightness and contrast (you'll often find brightening photos looks better)
- color saturation (you can make photos warmer by reducing the blue, for example)
- flip horizontally
- add border
- canvas size and resize photo
A trick many online shops use is to trim a photo so as to only show part of an item (see above right). Natural human curiosity often urges you to click the photo, just to see the rest of the photo. With good paint software it's a task (along with adjusting brightness, colours, etc) which should take less than one minute for an item.
Special Items - bottles
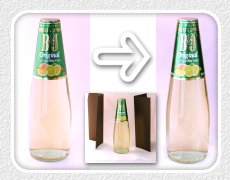 This example uses bottles, but any metallic or highly reflective items will probably benefit from this addition.
Take a look at the photo on the right. The bottle on the left looks slightly as if it were not really attached to the background, and this is because there is too much white is the shot. There is nothing to accentuate the edges of the bottle. So what you should do is place a column of rolled-up or folded black paper on either side of the bottle, as shown in the inset. This produces black reflections at the extreme edges of the bottle, while simultaneously lessening the dark reflections in the center of the bottle, and is the standard method for photographing items such as this.
Special Items - food
 Normally you should be aiming to remove almost all shadows from a product shot, and instead having no single evident light source. However for the case of food, you need to ensure that a shadow exists, and more partiularly that the shadow falls in front of the item, towards the camera. So you need to position your main light source behind and slightly to the left of an item.
When photographing food items, it's usually very effective to trim your photos so that only a partial image of the dish is presented.
Special Items - very large objects
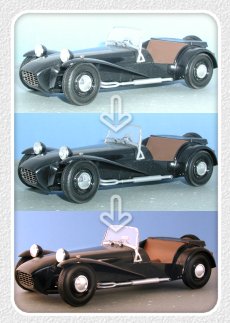 Our final advice concerns very large items - those which are too big to photograph indoors under controlled conditions. Sculptures and furniture sometimes fall into this area, although if at all possible you should shoot those indoors (in a garage or similar blank area). The main items that spring to mind are in fact motor vehicles; cars and bikes. Both of these would look strange indoors (unless in a purpose-built studio), when they naturally belong outdoors. However, shooting outdoors has many added complications, mostly associated with the over-abundance of natural daylight.
Here are some tips for photographing large items such as cars and bikes:
- Shoot at dawn or sunset - don't take your photos in the midday sun. The light source (the sun) will be directly overhead, and will create shadows strong enough to potentially ruin your photos. Instead, plan to take photos when the sun is almost horizontal on the horizon. Oh, and make sure you are shooting from the same side as the sunlight!
- Shoot from a low level - don't take your photos while standing over a car, so you get lots of roof. Instead, crouch down and take your photos from a horizontal position. It doesn't really matter which angle you shoot from horizontally (side, front or rear)... they will all look better than if taken from a higher point.
- Choose your background carefully - vehicles look better on plain, non-descript pieces of road or concrete. Vehicles don't belong on grass, and look strange when photographed that way. Try and ensure that the ground surface and background is dry, and free of distracting items such as signboards or eye-catching buildings. Motorcycles look good against purpose-built backgrounds - a simple sheet of industrial-steel-effect vinyl works well.
- Include your logo - to prevent image theft from your website, you should try and work in your logo somewhere. For cars, print your logo large and tape it to the car number plate. Or you could try printing it to blend with the road surface or background.
- Be wary of odd reflections - don't take photos next to trees or heavy cables, if your car's exterior is highly reflective. You might get some weird or spooky effects!
- Use flash - although for photos of small items taken indoors you should never use flash, when photographing large items like cars outdoors, you should ALWAYS force flash on your camera. When flash is used outdoors, it helps to EVEN OUT the natural lighting. Shadows become slighter, while car bodywork looks great when well-lit. Sounds strange, but try it. Needless to say, just make sure you don't stand directly on to your car's side when you take a flash photo; make sure you're at an angle.